

How to draw hibiscus step by step
*This post may contain affiliate links. This means when you click on a link and make a purchase we may earn a commission at no additional cost to you. Our goal is to provide valuable and helpful content. Any commission made can help us maintain this site and provide more quality and helpful content for our readers.*
Hibiscus can look like a complicated flower, but its quite easy to draw and can be drawn with a few steps. In this article we will discuss how to draw hibiscus in 3 different ways.
Materials needed :
- A pencil and eraser
- A Micro pen (0.25mm)
- A sketch book
How to draw hibiscus step by step
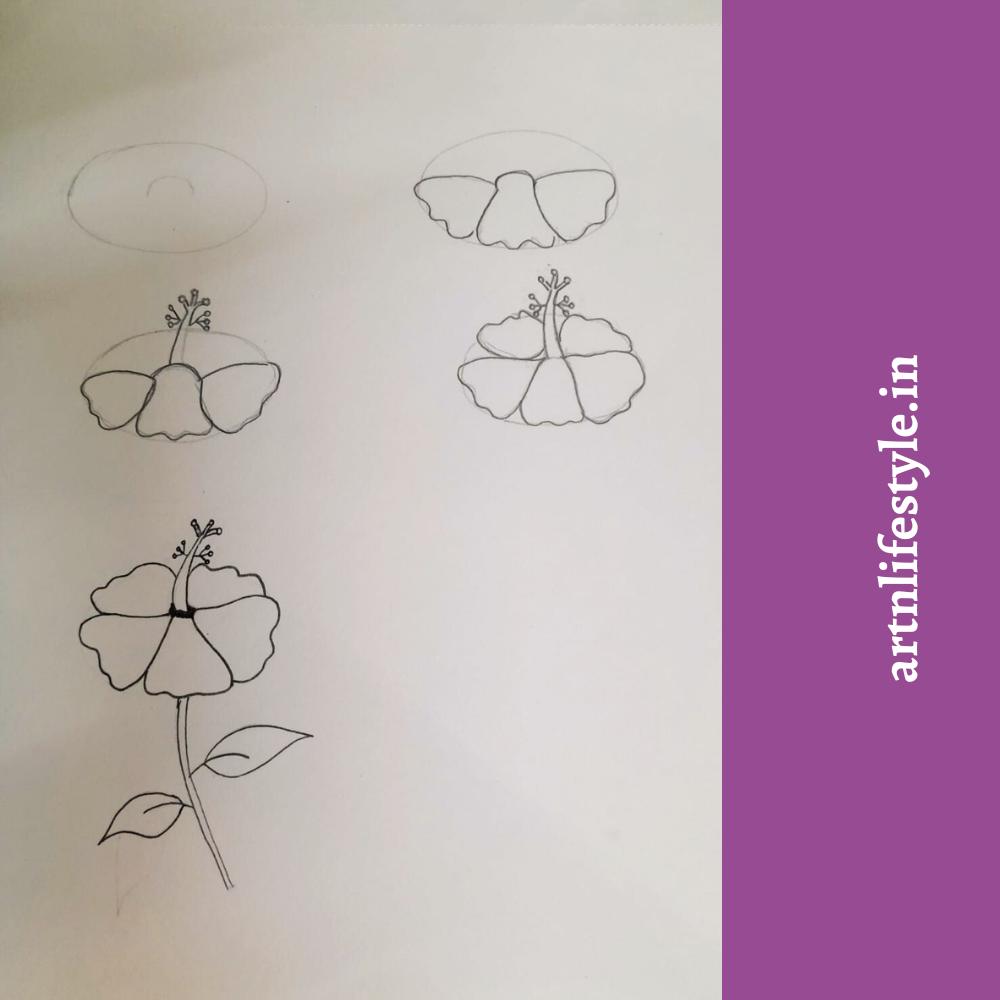
1. Draw a hibiscus flower facing sideways

Step 1:
Use a pencil to draw a oval shape facing slightly sideways. Draw a half oval (as shown in the picture) in the center.
Step 2:
Next draw three petals on the opposite side of the half oval.
Step 3:
Then draw the stamen on the opposite side of the three petals. Draw the stamen from the center of the half oval.
Step 4:
Then draw the other two petals to complete the flower. Use an eraser, and connect the petals to the center, making adjustments to the flower (as shown in the picture).
Step 5:
You can then draw the stem and leaves. Once your flower is complete, you can then use a micro pen and draw over your sketch. Then use an eraser to remove the pencil drawing. You can also colour your hibiscus flower with red or pink colour.
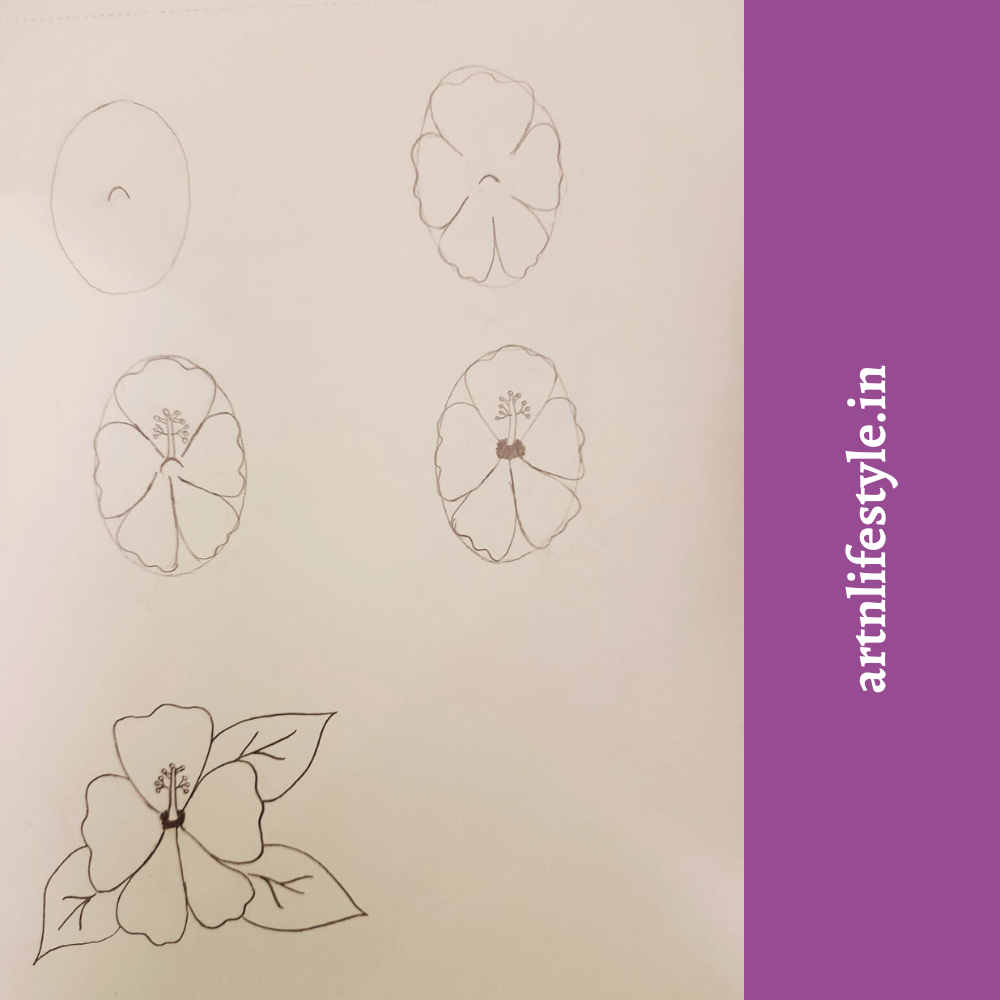
2. Draw hibiscus flower facing upwards
Step 1:
Use a pencil to draw an oval shape. Draw a half oval (as shown in the picture) in the center.
Step 2:
Next draw three petals on the opposite side of the half oval.
Step 3:
Next draw the stamen on the opposite side of the three petals. Draw the stamen from the center of the half oval.
Step 4:
Then draw the two petals to complete the flower. Use an eraser, and connect the petals to the center making adjustments to the flower (as shown in the picture)
Step 5:
You can then draw the stem and leaves. Once your flower is complete, you can then use a micro pen and draw over your sketch. Then use an eraser to remove the pencil drawing. You can colour your hibiscus flower using yellow, pink or red colour pencils.
3. Draw a hibiscus flower
Step 1:
Use a pencil to draw an oval shape. Draw a half oval (as shown in the picture) in the center.
Step 2:
Next draw the petals of the flower
Step 3:
Then draw the stamen as shown in the picture
Step 4:
Then slightly shade the area surrounding the stamen using a pencil
Step 5:
You can then draw the stem and leaves. Once your flower is complete, you can then use your micro pen to draw over your sketch. Then use an eraser to remove the pencil drawing. Colour your hibiscus flower with pink, red or yellow colour pencils.
Some hibiscus facts
1.Hibiscus flowers are native to tropical and Subtropical regions.
2.They grow best in warm and humid conditions.
3.These flowers come in several colours like white, red, pink and yellow.
4.Flowers grow an average of upto 7 inches.
5. These flowers attract lots of bees and butterflies.
Conclusion
Hibiscus flowers can be drawn easily by breaking it down into these simple steps. Adding colours to your flowers can make them even more beautiful. With a little practice and patience you can easily draw this hibiscus flower. So what are you waiting for grab your sketch book and colour pencils.
Check out other cool drawing ideas and tutorials below.
Read more:


