
Step by step cake drawing for kids
*This post may contain affiliate links. This means when you click on a link and make a purchase we may earn a commission at no additional cost to you. Our goal is to provide valuable and helpful content. Any commission made can help us maintain this site and provide more quality and helpful content for our readers.*
Looking for easy cake drawing tutorial? Whether you’re sketching for fun, creating a birthday card, or just exploring your creativity, this step-by-step guide will help you draw a cake. By breaking down the process into simple steps, you’ll be able to create a charming cake.Here is a step by step guide to draw a cake.
You will be needing a pencil, micropen, an eraser, sketchbook and colour pencils. Draw the cake using a pencil as light sketch. After you have completed your drawing you can use a micropen to draw over the sketch. You can then colour your drawing.
Step by step cake drawing
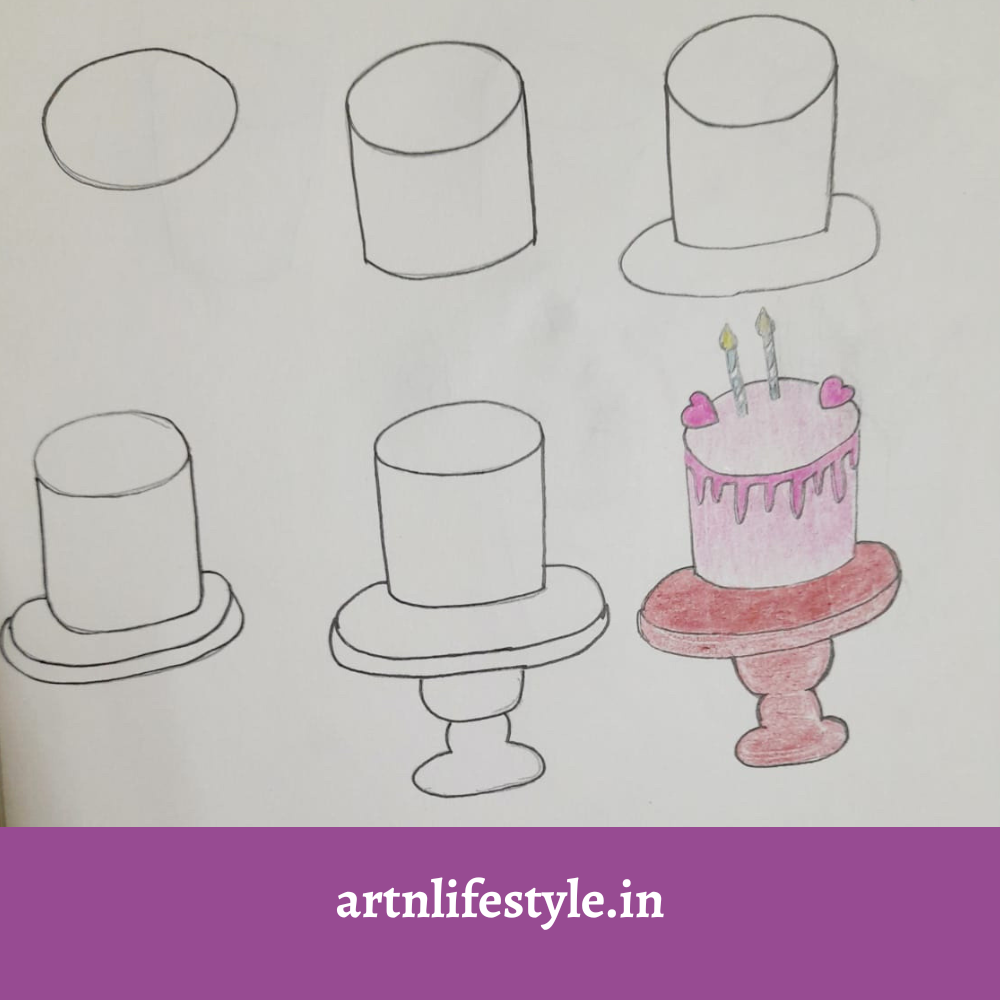
1. First draw a small ellipse.
2. Then draw the lines below for the cakes base.
3. Then draw the oval shape below as shown in the image for the stand
4. Then complete the stand as shown in the image
5. Then draw the cake design and the candles
6. Then use a micropen to draw over the sketch
7. Finally colour the cake
Fun facts about cake:
1.The origins of cake is said to trace 4000 years ago. It was made in ancient Egypt and it was once flat bread like shape sweetened with honey.
2.Queen victoria was the first to have icing in the cake during her wedding in 1840.
3.The worlds most expensive cake the pirates fantasy costs 35 million $!!! It is decorated with sapphire and jewellery
4. The largest cake ever made is a 130,000 pound 7 layer cake. It was made in 2005 for Las vegas 100th birthday.
Check out this article for other cake facts.
Conclusion:
With these steps, you’ve created a beautiful cake drawing. Try experimenting with different designs, decorations, and colour schemes to personalize your cake drawings. Whether you’re creating birthday cards, party invitations, or simply enjoying a fun drawing session, this tutorial can help to create a charming cake. Happy drawing!
Read more:
You May Also Like

20+ Easy doodles to draw

How to draw hibiscus step by step
